Spring Security教程 相对于 Shiro,在 SSM/SSH 中整合 Spring Security 都是比较麻烦的操作,所以,Spring Security 虽然功能比 Shiro 强大,但是使用反而没有 Shiro 多(Shiro 虽然功能没有 Spring Security 多,但是对于大部分项目而言,Shiro 也够用了)。
自从有了 Spring Boot 之后,Spring Boot 对于 Spring Security 提供了 自动化配置方案,可以零配置使用 Spring Security。
因此,一般来说,常见的安全管理技术栈的组合是这样的:
SSM + Shiro Spring Boot/Spring Cloud + Spring Security 1.项目创建 pom.xml 中的 Spring Security 依赖:
1
2
3
4
<dependency> <groupId>org.springframework.boot</groupId> <artifactId>spring-boot-starter-security</artifactId> </dependency>
只要加入依赖,项目的所有接口都会被自动保护起来。
2.初次体验 我们创建一个 HelloController:
1
2
3
4
5
6
7
@RestController public class HelloController { @GetMapping("/hello") public String hello() { return "hello"; } }
访问 /hello ,需要登录之后才能访问。
当用户从浏览器发送请求访问 /hello 接口时,服务端会返回 302 响应码,让客户端重定向到 /login 页面,用户在 /login 页面登录,登陆成功之后,就会自动跳转到 /hello 接口。
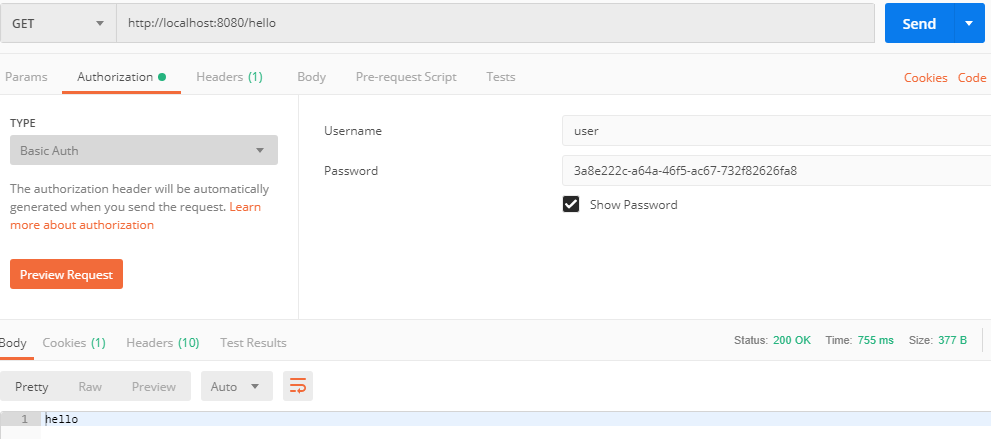
另外,也可以使用 POSTMAN 来发送请求,使用 POSTMAN 发送请求时,可以将用户信息放在请求头中(这样可以避免重定向到登录页面):
通过以上两种不同的登录方式,可以看出,Spring Security 支持两种不同的认证方式:
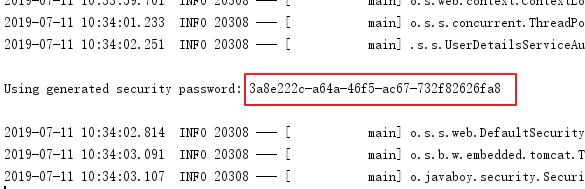
可以通过 form 表单来认证 可以通过 HttpBasic 来认证 3.用户名配置 默认情况下,登录的用户名是 user ,密码则是项目启动时随机生成的字符串,可以从启动的控制台日志中看到默认密码:
这个随机生成的密码,每次启动时都会变。对登录的用户名/密码进行配置,有三种不同的方式:
在 application.properties 中进行配置 通过 Java 代码配置在内存中 通过 Java 从数据库中加载 3.1 配置文件配置用户名/密码 可以直接在 application.properties 文件中配置用户的基本信息:
1
2
spring.security.user.name=javaboy spring.security.user.password=123
配置完成后,重启项目,就可以使用这里配置的用户名/密码登录了。
3.2 Java 配置用户名/密码 也可以在 Java 代码中配置用户名密码,首先需要我们创建一个 Spring Security 的配置类,集成自 WebSecurityConfigurerAdapter 类,如下:
1
2
3
4
5
6
7
8
9
10
11
12
13
14
15
@Configuration public class SecurityConfig extends WebSecurityConfigurerAdapter { @Override protected void configure(AuthenticationManagerBuilder auth) throws Exception { //下面这两行配置表示在内存中配置了两个用户 auth.inMemoryAuthentication() .withUser("javaboy").roles("admin").password("$2a$10$OR3VSksVAmCzc.7WeaRPR.t0wyCsIj24k0Bne8iKWV1o.V9wsP8Xe") .and() .withUser("lisi").roles("user").password("$2a$10$p1H8iWa8I4.CA.7Z8bwLjes91ZpY.rYREGHQEInNtAp4NzL6PLKxi"); } @Bean PasswordEncoder passwordEncoder() { return new BCryptPasswordEncoder(); } }
这里我们在 configure 方法中配置了两个用户,用户的密码都是加密之后的字符串(明文是 123),从 Spring5 开始,强制要求密码要加密,如果非不想加密,可以使用一个过期的 PasswordEncoder 的实例 NoOpPasswordEncoder,但是不建议这么做,毕竟不安全。
Spring Security 中提供了 BCryptPasswordEncoder 密码编码工具,可以非常方便的实现密码的加密加盐,相同明文加密出来的结果总是不同,这样就不需要用户去额外保存盐的字段了,这一点比 Shiro 要方便很多。
4.登录配置 对于登录接口,登录成功后的响应,登录失败后的响应,我们都可以在 WebSecurityConfigurerAdapter 的实现类中进行配置。例如下面这样:
1
2
3
4
5
6
7
8
9
10
11
12
13
14
15
16
17
18
19
20
21
22
23
24
25
26
27
28
29
30
31
32
33
34
35
36
37
38
39
40
41
42
43
44
45
46
47
48
49
50
51
52
53
54
55
56
57
58
59
60
@Configuration public class SecurityConfig extends WebSecurityConfigurerAdapter { @Autowired VerifyCodeFilter verifyCodeFilter; @Override protected void configure(HttpSecurity http) throws Exception { http.addFilterBefore(verifyCodeFilter, UsernamePasswordAuthenticationFilter.class); http .authorizeRequests()//开启登录配置 .antMatchers("/hello").hasRole("admin")//表示访问 /hello 这个接口,需要具备 admin 这个角色 .anyRequest().authenticated()//表示剩余的其他接口,登录之后就能访问 .and() .formLogin() //定义登录页面,未登录时,访问一个需要登录之后才能访问的接口,会自动跳转到该页面 .loginPage("/login_p") //登录处理接口 .loginProcessingUrl("/doLogin") //定义登录时,用户名的 key,默认为 username .usernameParameter("uname") //定义登录时,用户密码的 key,默认为 password .passwordParameter("passwd") //登录成功的处理器 .successHandler(new AuthenticationSuccessHandler() { @Override public void onAuthenticationSuccess(HttpServletRequest req, HttpServletResponse resp, Authentication authentication) throws IOException, ServletException { resp.setContentType("application/json;charset=utf-8"); PrintWriter out = resp.getWriter(); out.write("success"); out.flush(); } }) .failureHandler(new AuthenticationFailureHandler() { @Override public void onAuthenticationFailure(HttpServletRequest req, HttpServletResponse resp, AuthenticationException exception) throws IOException, ServletException { resp.setContentType("application/json;charset=utf-8"); PrintWriter out = resp.getWriter(); out.write("fail"); out.flush(); } }) .permitAll()//和表单登录相关的接口统统都直接通过 .and() .logout() .logoutUrl("/logout") .logoutSuccessHandler(new LogoutSuccessHandler() { @Override public void onLogoutSuccess(HttpServletRequest req, HttpServletResponse resp, Authentication authentication) throws IOException, ServletException { resp.setContentType("application/json;charset=utf-8"); PrintWriter out = resp.getWriter(); out.write("logout success"); out.flush(); } }) .permitAll() .and() .httpBasic() .and() .csrf().disable(); } }
我们可以在 successHandler 方法中,配置登录成功的回调,如果是前后端分离开发的话,登录成功后返回 JSON 即可,同理,failureHandler 方法中配置登录失败的回调,logoutSuccessHandler 中则配置注销成功的回调。
5.忽略拦截 如果某一个请求地址不需要拦截的话,有两种方式实现:
设置该地址匿名访问 直接过滤掉该地址,即该地址不走 Spring Security 过滤器链 推荐使用第二种方案,配置如下:
1
2
3
4
5
6
7
@Configuration public class SecurityConfig extends WebSecurityConfigurerAdapter { @Override public void configure(WebSecurity web) throws Exception { web.ignoring().antMatchers("/vercode"); } }
Spring Security 另外一个强大之处就是它可以结合 OAuth2 ,玩出更多的花样出来。
Spring Security 登录添加验证码 准备验证码 要有验证码,首先得先准备好验证码,本文采用 Java 自画的验证码,代码如下:
1
2
3
4
5
6
7
8
9
10
11
12
13
14
15
16
17
18
19
20
21
22
23
24
25
26
27
28
29
30
31
32
33
34
35
36
37
38
39
40
41
42
43
44
45
46
47
48
49
50
51
52
53
54
55
56
57
58
59
60
61
62
63
64
65
66
67
68
69
70
71
72
73
74
75
76
77
78
79
80
81
82
83
84
85
86
87
88
89
90
91
92
93
94
95
96
97
98
99
100
101
102
103
/** * 生成验证码的工具类 */ public class VerifyCode { private int width = 100;// 生成验证码图片的宽度 private int height = 50;// 生成验证码图片的高度 private String[] fontNames = { "宋体", "楷体", "隶书", "微软雅黑" }; private Color bgColor = new Color(255, 255, 255);// 定义验证码图片的背景颜色为白色 private Random random = new Random(); private String codes = "0123456789abcdefghijklmnopqrstuvwxyzABCDEFGHIJKLMNOPQRSTUVWXYZ"; private String text;// 记录随机字符串 /** * 获取一个随意颜色 * * @return */ private Color randomColor() { int red = random.nextInt(150); int green = random.nextInt(150); int blue = random.nextInt(150); return new Color(red, green, blue); } /** * 获取一个随机字体 * * @return */ private Font randomFont() { String name = fontNames[random.nextInt(fontNames.length)]; int style = random.nextInt(4); int size = random.nextInt(5) + 24; return new Font(name, style, size); } /** * 获取一个随机字符 * * @return */ private char randomChar() { return codes.charAt(random.nextInt(codes.length())); } /** * 创建一个空白的BufferedImage对象 * * @return */ private BufferedImage createImage() { BufferedImage image = new BufferedImage(width, height, BufferedImage.TYPE_INT_RGB); Graphics2D g2 = (Graphics2D) image.getGraphics(); g2.setColor(bgColor);// 设置验证码图片的背景颜色 g2.fillRect(0, 0, width, height); return image; } public BufferedImage getImage() { BufferedImage image = createImage(); Graphics2D g2 = (Graphics2D) image.getGraphics(); StringBuffer sb = new StringBuffer(); for (int i = 0; i < 4; i++) { String s = randomChar() + ""; sb.append(s); g2.setColor(randomColor()); g2.setFont(randomFont()); float x = i * width * 1.0f / 4; g2.drawString(s, x, height - 15); } this.text = sb.toString(); drawLine(image); return image; } /** * 绘制干扰线 * * @param image */ private void drawLine(BufferedImage image) { Graphics2D g2 = (Graphics2D) image.getGraphics(); int num = 5; for (int i = 0; i < num; i++) { int x1 = random.nextInt(width); int y1 = random.nextInt(height); int x2 = random.nextInt(width); int y2 = random.nextInt(height); g2.setColor(randomColor()); g2.setStroke(new BasicStroke(1.5f)); g2.drawLine(x1, y1, x2, y2); } } public String getText() { return text; } public static void output(BufferedImage image, OutputStream out) throws IOException { ImageIO.write(image, "JPEG", out); } }
这个工具类很常见,网上也有很多,就是画一个简单的验证码,通过流将验证码写到前端页面,提供验证码的 Controller 如下:
1
2
3
4
5
6
7
8
9
10
11
12
@RestController public class VerifyCodeController { @GetMapping("/vercode") public void code(HttpServletRequest req, HttpServletResponse resp) throws IOException { VerifyCode vc = new VerifyCode(); BufferedImage image = vc.getImage(); String text = vc.getText(); HttpSession session = req.getSession(); session.setAttribute("index_code", text); VerifyCode.output(image, resp.getOutputStream()); } }
这里创建了一个 VerifyCode 对象,将生成的验证码字符保存到 session 中,然后通过流将图片写到前端,img标签如下:
1 <img src="/vercode" alt="">
展示效果如下:
自定义过滤器 在登陆页展示验证码这个就不需要我多说了,接下来我们来看看如何自定义验证码处理器:
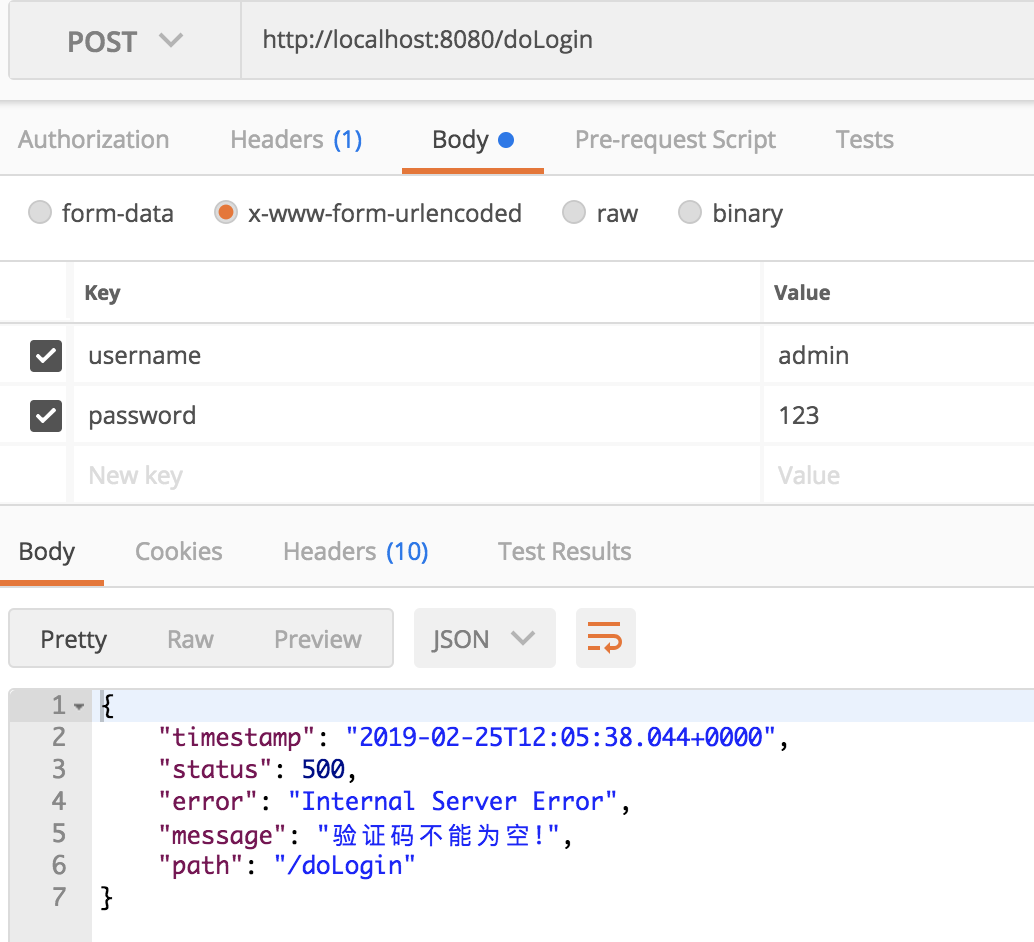
1
2
3
4
5
6
7
8
9
10
11
12
13
14
15
16
17
18
19
20
21
22
@Component public class VerifyCodeFilter extends GenericFilterBean { private String defaultFilterProcessUrl = "/doLogin"; @Override public void doFilter(ServletRequest req, ServletResponse res, FilterChain chain) throws IOException, ServletException { HttpServletRequest request = (HttpServletRequest) req; HttpServletResponse response = (HttpServletResponse) res; if ("POST".equalsIgnoreCase(request.getMethod()) && defaultFilterProcessUrl.equals(request.getServletPath())) { // 验证码验证 String requestCaptcha = request.getParameter("code"); String genCaptcha = (String) request.getSession().getAttribute("index_code"); if (StringUtils.isEmpty(requestCaptcha)) throw new AuthenticationServiceException("验证码不能为空!"); if (!genCaptcha.toLowerCase().equals(requestCaptcha.toLowerCase())) { throw new AuthenticationServiceException("验证码错误!"); } } chain.doFilter(request, response); } }
自定义过滤器继承自 GenericFilterBean ,并实现其中的 doFilter 方法,在 doFilter 方法中,当请求方法是 POST ,并且请求地址是 /doLogin 时,获取参数中的 code 字段值,该字段保存了用户从前端页面传来的验证码,然后获取 session 中保存的验证码,如果用户没有传来验证码,则抛出验证码不能为空异常,如果用户传入了验证码,则判断验证码是否正确,如果不正确则抛出异常,否则执行 chain.doFilter(request, response); 使请求继续向下走。
配置 最后在 Spring Security 的配置中,配置过滤器,如下:
1
2
3
4
5
6
7
8
9
10
11
12
13
14
15
16
17
18
19
@Configuration public class SecurityConfig extends WebSecurityConfigurerAdapter { @Autowired VerifyCodeFilter verifyCodeFilter; ... ... @Override protected void configure(HttpSecurity http) throws Exception { http.addFilterBefore(verifyCodeFilter, UsernamePasswordAuthenticationFilter.class); http.authorizeRequests() .antMatchers("/admin/**").hasRole("admin") ... ... .permitAll() .and() .csrf().disable(); } }
这里只贴出了部分核心代码,即 http.addFilterBefore(verifyCodeFilter, UsernamePasswordAuthenticationFilter.class); ,如此之后,整个配置就算完成了。
Spring Security 登录使用 JSON 格式数据 在使用 SpringSecurity 中,大伙都知道默认的登录数据是通过 key/value 的形式来传递的,默认情况下不支持 JSON格式的登录数据,如果有这种需求,就需要自己来解决。
在说如何使用 JSON 登录之前,我们还是先来看看基本的登录吧,本文为了简单,SpringSecurity 在使用中就不连接数据库了,直接在内存中配置用户名和密码,具体操作步骤如下:
首先创建 SpringBoot 工程,添加 SpringSecurity 依赖,如下:
1
2
3
4
5
6
7
8
<dependency> <groupId>org.springframework.boot</groupId> <artifactId>spring-boot-starter-security</artifactId> </dependency> <dependency> <groupId>org.springframework.boot</groupId> <artifactId>spring-boot-starter-web</artifactId> </dependency>
创建 SecurityConfig,完成 SpringSecurity 的配置,如下:
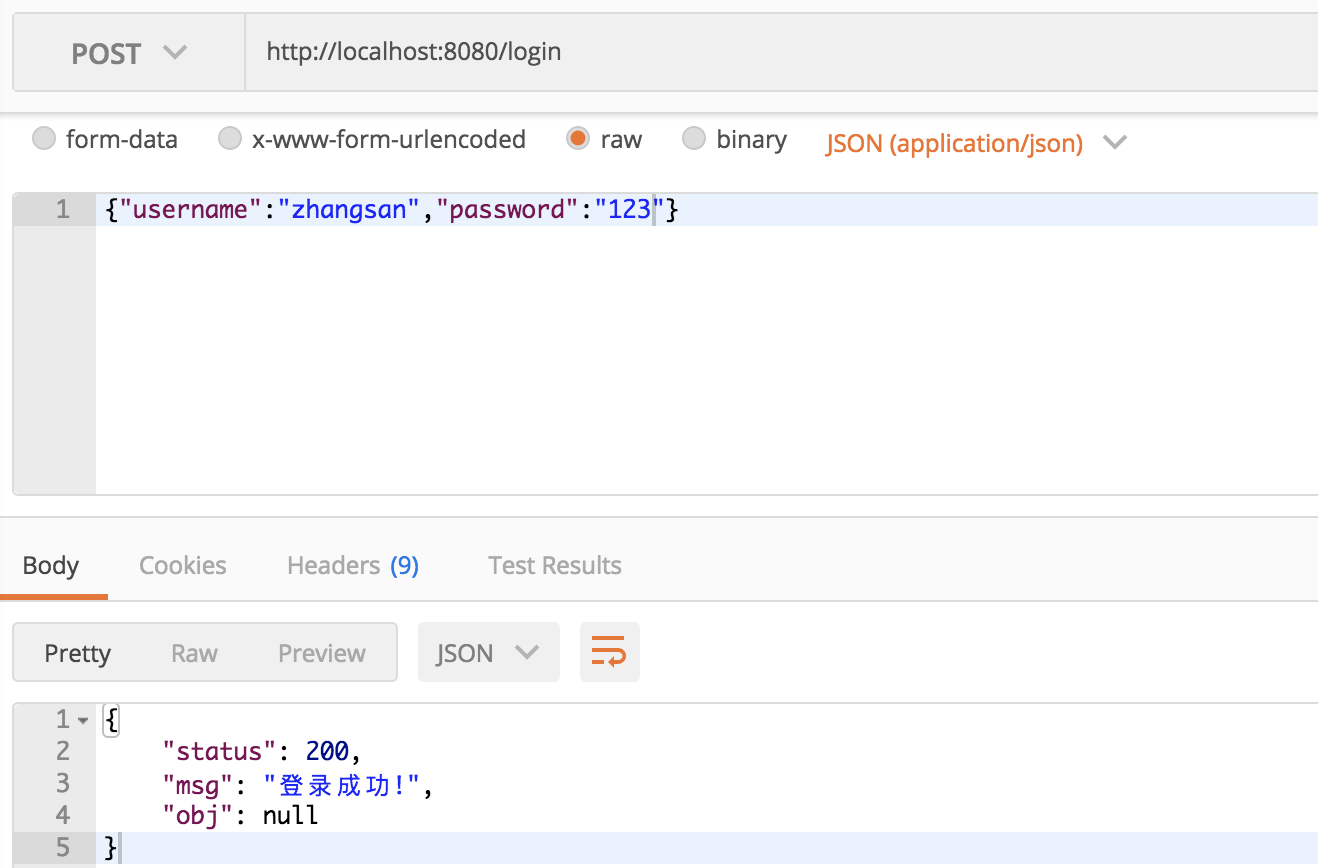
1
2
3
4
5
6
7
8
9
10
11
12
13
14
15
16
17
18
19
20
21
22
23
24
25
26
27
28
29
30
31
32
33
34
35
36
37
38
39
40
41
42
43
44
45
46
47
48
49
50
51
52
53
54
55
56
57
58
59
60
61
62
63
64
65
66
67
68
69
70
71
72
73
74
75
76
77
78
79
80
@Configuration public class SecurityConfig extends WebSecurityConfigurerAdapter { @Bean PasswordEncoder passwordEncoder() { return new BCryptPasswordEncoder(); } @Override protected void configure(AuthenticationManagerBuilder auth) throws Exception { auth.inMemoryAuthentication().withUser("zhangsan").password("$2a$10$2O4EwLrrFPEboTfDOtC0F.RpUMk.3q3KvBHRx7XXKUMLBGjOOBs8q").roles("user"); } @Override public void configure(WebSecurity web) throws Exception { } @Override protected void configure(HttpSecurity http) throws Exception { http.authorizeRequests() .anyRequest().authenticated() .and() .formLogin() .loginProcessingUrl("/doLogin") .successHandler(new AuthenticationSuccessHandler() { @Override public void onAuthenticationSuccess(HttpServletRequest req, HttpServletResponse resp, Authentication authentication) throws IOException, ServletException { RespBean ok = RespBean.ok("登录成功!",authentication.getPrincipal()); resp.setContentType("application/json;charset=utf-8"); PrintWriter out = resp.getWriter(); out.write(new ObjectMapper().writeValueAsString(ok)); out.flush(); out.close(); } }) .failureHandler(new AuthenticationFailureHandler() { @Override public void onAuthenticationFailure(HttpServletRequest req, HttpServletResponse resp, AuthenticationException e) throws IOException, ServletException { RespBean error = RespBean.error("登录失败"); resp.setContentType("application/json;charset=utf-8"); PrintWriter out = resp.getWriter(); out.write(new ObjectMapper().writeValueAsString(error)); out.flush(); out.close(); } }) .loginPage("/login") .permitAll() .and() .logout() .logoutUrl("/logout") .logoutSuccessHandler(new LogoutSuccessHandler() { @Override public void onLogoutSuccess(HttpServletRequest req, HttpServletResponse resp, Authentication authentication) throws IOException, ServletException { RespBean ok = RespBean.ok("注销成功!"); resp.setContentType("application/json;charset=utf-8"); PrintWriter out = resp.getWriter(); out.write(new ObjectMapper().writeValueAsString(ok)); out.flush(); out.close(); } }) .permitAll() .and() .csrf() .disable() .exceptionHandling() .accessDeniedHandler(new AccessDeniedHandler() { @Override public void handle(HttpServletRequest req, HttpServletResponse resp, AccessDeniedException e) throws IOException, ServletException { RespBean error = RespBean.error("权限不足,访问失败"); resp.setStatus(403); resp.setContentType("application/json;charset=utf-8"); PrintWriter out = resp.getWriter(); out.write(new ObjectMapper().writeValueAsString(error)); out.flush(); out.close(); } }); } }
这里的配置虽然有点长,但是很基础,配置含义也比较清晰,首先提供 BCryptPasswordEncoder 作为 PasswordEncoder ,可以实现对密码的自动加密加盐,非常方便,然后提供了一个名为 zhangsan 的用户,密码是 123 ,角色是 user ,最后配置登录逻辑,所有的请求都需要登录后才能访问,登录接口是 /doLogin ,用户名的 key 是 username ,密码的 key 是 password ,同时配置登录成功、登录失败以及注销成功、权限不足时都给用户返回JSON提示,另外,这里虽然配置了登录页面为 /login ,实际上这不是一个页面,而是一段 JSON ,在 LoginController 中提供该接口,如下:
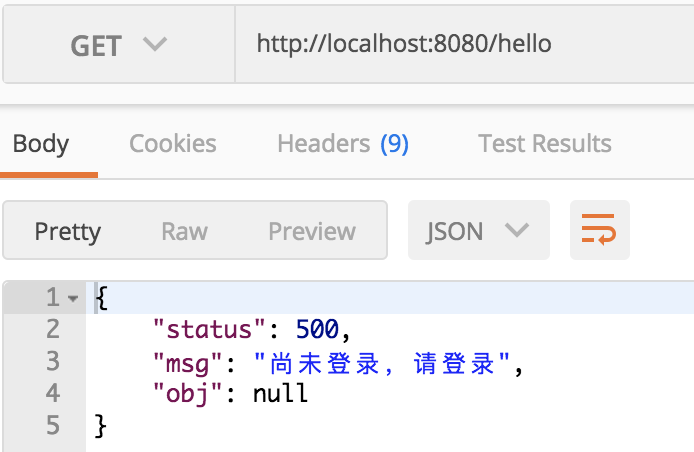
1
2
3
4
5
6
7
8
9
10
11
12
@RestController @ResponseBody public class LoginController { @GetMapping("/login") public RespBean login() { return RespBean.error("尚未登录,请登录"); } @GetMapping("/hello") public String hello() { return "hello"; } }
这里 /login 只是一个 JSON 提示,而不是页面, /hello 则是一个测试接口。
OK,做完上述步骤就可以开始测试了,运行SpringBoot项目,访问 /hello 接口,结果如下:
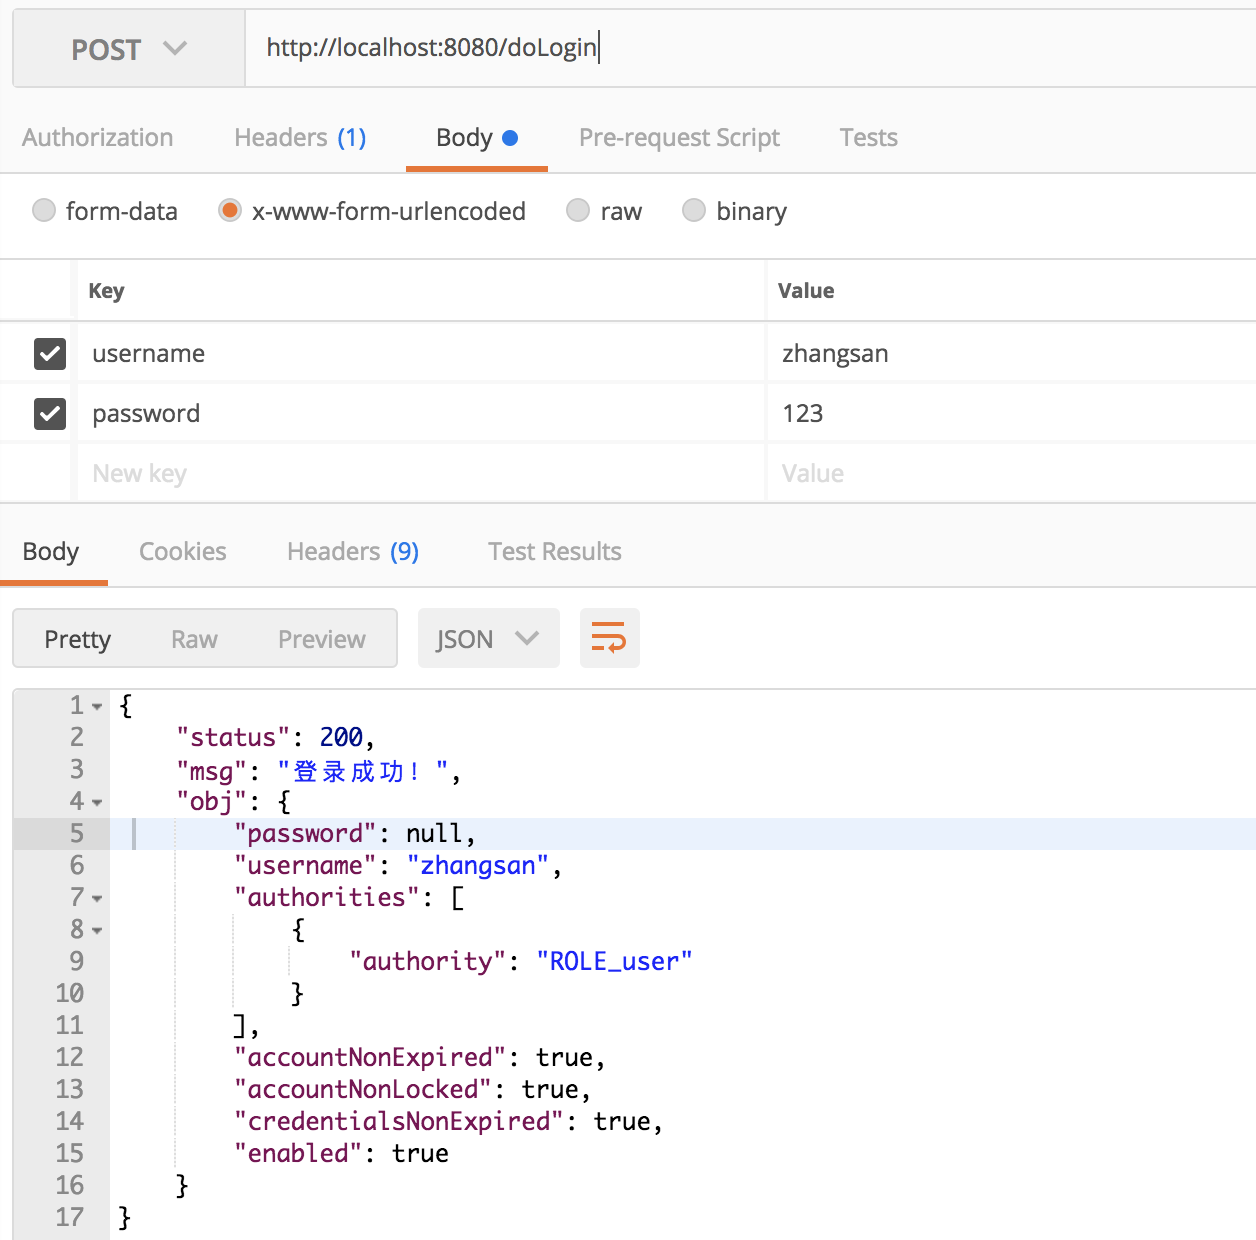
此时先调用登录接口进行登录,如下:
登录成功后,再去访问 /hello 接口就可以成功访问了。
使用JSON登录 上面演示的是一种原始的登录方案,如果想将用户名密码通过 JSON 的方式进行传递,则需要自定义相关过滤器,通过分析源码我们发现,默认的用户名密码提取在 UsernamePasswordAuthenticationFilter 过滤器中,部分源码如下:
1
2
3
4
5
6
7
8
9
10
11
12
13
14
15
16
17
18
19
20
21
22
23
24
25
26
27
28
29
30
31
32
33
34
35
36
37
38
39
40
41
42
43
44
45
46
47
48
49
50
51
public class UsernamePasswordAuthenticationFilter extends AbstractAuthenticationProcessingFilter { public static final String SPRING_SECURITY_FORM_USERNAME_KEY = "username"; public static final String SPRING_SECURITY_FORM_PASSWORD_KEY = "password"; private String usernameParameter = SPRING_SECURITY_FORM_USERNAME_KEY; private String passwordParameter = SPRING_SECURITY_FORM_PASSWORD_KEY; private boolean postOnly = true; public UsernamePasswordAuthenticationFilter() { super(new AntPathRequestMatcher("/login", "POST")); } public Authentication attemptAuthentication(HttpServletRequest request, HttpServletResponse response) throws AuthenticationException { if (postOnly && !request.getMethod().equals("POST")) { throw new AuthenticationServiceException( "Authentication method not supported: " + request.getMethod()); } String username = obtainUsername(request); String password = obtainPassword(request); if (username == null) { username = ""; } if (password == null) { password = ""; } username = username.trim(); UsernamePasswordAuthenticationToken authRequest = new UsernamePasswordAuthenticationToken( username, password); // Allow subclasses to set the "details" property setDetails(request, authRequest); return this.getAuthenticationManager().authenticate(authRequest); } protected String obtainPassword(HttpServletRequest request) { return request.getParameter(passwordParameter); } protected String obtainUsername(HttpServletRequest request) { return request.getParameter(usernameParameter); } //... //... }
从这里可以看到,默认的用户名/密码提取就是通过 request 中的 getParameter 来提取的,如果想使用 JSON 传递用户名密码,只需要将这个过滤器替换掉即可,自定义过滤器如下:
1
2
3
4
5
6
7
8
9
10
11
12
13
14
15
16
17
18
19
20
21
22
23
24
25
public class CustomAuthenticationFilter extends UsernamePasswordAuthenticationFilter { @Override public Authentication attemptAuthentication(HttpServletRequest request, HttpServletResponse response) throws AuthenticationException { if (request.getContentType().equals(MediaType.APPLICATION_JSON_UTF8_VALUE) || request.getContentType().equals(MediaType.APPLICATION_JSON_VALUE)) { ObjectMapper mapper = new ObjectMapper(); UsernamePasswordAuthenticationToken authRequest = null; try (InputStream is = request.getInputStream()) { Map<String,String> authenticationBean = mapper.readValue(is, Map.class); authRequest = new UsernamePasswordAuthenticationToken( authenticationBean.get("username"), authenticationBean.get("password")); } catch (IOException e) { e.printStackTrace(); authRequest = new UsernamePasswordAuthenticationToken( "", ""); } finally { setDetails(request, authRequest); return this.getAuthenticationManager().authenticate(authRequest); } } else { return super.attemptAuthentication(request, response); } } }
这里只是将用户名/密码的获取方案重新修正下,改为了从 JSON 中获取用户名密码,然后在 SecurityConfig 中作出如下修改:
1
2
3
4
5
6
7
8
9
10
11
12
13
14
15
16
17
18
19
20
21
22
23
24
25
26
27
28
29
30
31
32
33
34
35
36
@Override protected void configure(HttpSecurity http) throws Exception { http.authorizeRequests().anyRequest().authenticated() .and() .formLogin() .and().csrf().disable(); http.addFilterAt(customAuthenticationFilter(), UsernamePasswordAuthenticationFilter.class); } @Bean CustomAuthenticationFilter customAuthenticationFilter() throws Exception { CustomAuthenticationFilter filter = new CustomAuthenticationFilter(); filter.setAuthenticationSuccessHandler(new AuthenticationSuccessHandler() { @Override public void onAuthenticationSuccess(HttpServletRequest req, HttpServletResponse resp, Authentication authentication) throws IOException, ServletException { resp.setContentType("application/json;charset=utf-8"); PrintWriter out = resp.getWriter(); RespBean respBean = RespBean.ok("登录成功!"); out.write(new ObjectMapper().writeValueAsString(respBean)); out.flush(); out.close(); } }); filter.setAuthenticationFailureHandler(new AuthenticationFailureHandler() { @Override public void onAuthenticationFailure(HttpServletRequest req, HttpServletResponse resp, AuthenticationException e) throws IOException, ServletException { resp.setContentType("application/json;charset=utf-8"); PrintWriter out = resp.getWriter(); RespBean respBean = RespBean.error("登录失败!"); out.write(new ObjectMapper().writeValueAsString(respBean)); out.flush(); out.close(); } }); filter.setAuthenticationManager(authenticationManagerBean()); return filter; }
将自定义的 CustomAuthenticationFilter 类加入进来即可,接下来就可以使用 JSON 进行登录了,如下:
Spring Security 中的角色继承问题 角色继承实际上是一个很常见的需求,因为大部分公司治理可能都是金字塔形的,上司可能具备下属的部分甚至所有权限,这一现实场景,反映到我们的代码中,就是角色继承了。 Spring Security 中为开发者提供了相关的角色继承解决方案,但是这一解决方案在最近的 Spring Security 版本变迁中,使用方法有所变化。
在 Spring Boot2.0.8(对应 Spring Security 也是 5.0.11)上面是一种写法,从 Spring Boot2.1.0(对应 Spring Security5.1.1)又是另外一种写法
以前的写法 这里说的以前写法,就是指 SpringBoot2.0.8(含)之前的写法,在之前的写法中,角色继承只需要开发者提供一个 RoleHierarchy 接口的实例即可,例如下面这样:
1
2
3
4
5
6
7
@Bean RoleHierarchy roleHierarchy() { RoleHierarchyImpl roleHierarchy = new RoleHierarchyImpl(); String hierarchy = "ROLE_dba > ROLE_admin ROLE_admin > ROLE_user"; roleHierarchy.setHierarchy(hierarchy); return roleHierarchy; }
在这里我们提供了一个 RoleHierarchy 接口的实例,使用字符串来描述了角色之间的继承关系, ROLE_dba 具备 ROLE_admin 的所有权限,而 ROLE_admin 则具备 ROLE_user 的所有权限,继承与继承之间用一个空格隔开。提供了这个 Bean 之后,以后所有具备 ROLE_user 角色才能访问的资源, ROLE_dba 和 ROLE_admin 也都能访问,具备 ROLE_amdin 角色才能访问的资源, ROLE_dba 也能访问。
现在的写法 但是上面这种写法仅限于 Spring Boot2.0.8(含)之前的版本,在之后的版本中,这种写法则不被支持,新版的写法是下面这样:
1
2
3
4
5
6
7
@Bean RoleHierarchy roleHierarchy() { RoleHierarchyImpl roleHierarchy = new RoleHierarchyImpl(); String hierarchy = "ROLE_dba > ROLE_admin \n ROLE_admin > ROLE_user"; roleHierarchy.setHierarchy(hierarchy); return roleHierarchy; }
变化主要就是分隔符,将原来用空格隔开的地方,现在用换行符了。这里表达式的含义依然和上面一样,不再赘述。
上面两种不同写法都是配置角色的继承关系,配置完成后,接下来指定角色和资源的对应关系即可,如下:
1
2
3
4
5
6
7
8
9
10
11
12
13
14
15
@Override protected void configure(HttpSecurity http) throws Exception { http.authorizeRequests().antMatchers("/admin/**") .hasRole("admin") .antMatchers("/db/**") .hasRole("dba") .antMatchers("/user/**") .hasRole("user") .and() .formLogin() .loginProcessingUrl("/doLogin") .permitAll() .and() .csrf().disable(); }
这个表示 /db/** 格式的路径需要具备 dba 角色才能访问, /admin/** 格式的路径则需要具备 admin 角色才能访问, /user/** 格式的路径,则需要具备 user 角色才能访问,此时提供相关接口,会发现,dba 除了访问 /db/** ,也能访问 /admin/** 和 /user/** ,admin 角色除了访问 /admin/** ,也能访问 /user/** ,user 角色则只能访问 /user/** 。
源码分析 这样两种不同的写法,其实也对应了两种不同的解析策略,角色继承关系的解析在 RoleHierarchyImpl 类的 buildRolesReachableInOneStepMap 方法中,Spring Boot2.0.8(含)之前该方法的源码如下:
1
2
3
4
5
6
7
8
9
10
11
12
13
14
15
16
17
18
19
20
21
22
23
24
25
private void buildRolesReachableInOneStepMap() { Pattern pattern = Pattern.compile("(\\s*([^\\s>]+)\\s*>\\s*([^\\s>]+))"); Matcher roleHierarchyMatcher = pattern .matcher(this.roleHierarchyStringRepresentation); this.rolesReachableInOneStepMap = new HashMap<GrantedAuthority, Set<GrantedAuthority>>(); while (roleHierarchyMatcher.find()) { GrantedAuthority higherRole = new SimpleGrantedAuthority( roleHierarchyMatcher.group(2)); GrantedAuthority lowerRole = new SimpleGrantedAuthority( roleHierarchyMatcher.group(3)); Set<GrantedAuthority> rolesReachableInOneStepSet; if (!this.rolesReachableInOneStepMap.containsKey(higherRole)) { rolesReachableInOneStepSet = new HashSet<>(); this.rolesReachableInOneStepMap.put(higherRole, rolesReachableInOneStepSet); } else { rolesReachableInOneStepSet = this.rolesReachableInOneStepMap .get(higherRole); } addReachableRoles(rolesReachableInOneStepSet, lowerRole); logger.debug("buildRolesReachableInOneStepMap() - From role " + higherRole + " one can reach role " + lowerRole + " in one step."); } }
从这段源码中我们可以看到,角色的继承关系是通过正则表达式进行解析,通过空格进行切分,然后构建相应的 map 出来。
Spring Boot2.1.0(含)之后该方法的源码如下:
1
2
3
4
5
6
7
8
9
10
11
12
13
14
15
16
17
18
19
20
21
22
23
24
25
26
27
28
private void buildRolesReachableInOneStepMap() { this.rolesReachableInOneStepMap = new HashMap<GrantedAuthority, Set<GrantedAuthority>>(); try (BufferedReader bufferedReader = new BufferedReader( new StringReader(this.roleHierarchyStringRepresentation))) { for (String readLine; (readLine = bufferedReader.readLine()) != null;) { String[] roles = readLine.split(" > "); for (int i = 1; i < roles.length; i++) { GrantedAuthority higherRole = new SimpleGrantedAuthority( roles[i - 1].replaceAll("^\\s+|\\s+$", "")); GrantedAuthority lowerRole = new SimpleGrantedAuthority(roles[i].replaceAll("^\\s+|\\s+$ Set<GrantedAuthority> rolesReachableInOneStepSet; if (!this.rolesReachableInOneStepMap.containsKey(higherRole)) { rolesReachableInOneStepSet = new HashSet<GrantedAuthority>(); this.rolesReachableInOneStepMap.put(higherRole, rolesReachableInOneStepSet); } else { rolesReachableInOneStepSet = this.rolesReachableInOneStepMap.get(higherRole); } addReachableRoles(rolesReachableInOneStepSet, lowerRole); if (logger.isDebugEnabled()) { logger.debug("buildRolesReachableInOneStepMap() - From role " + higherRole + " one can reach role " + lowerRole + " in one step."); } } } } catch (IOException e) { throw new IllegalStateException(e); } }
从这里我们可以看到,这里并没有一上来就是用正则表达式,而是先将角色继承字符串转为一个 BufferedReader ,然后一行一行的读出来,再进行解析,最后再构建相应的 map。从这里我们可以看出为什么前后版本对此有不同的写法。
干货|一个案例学会Spring Security 中使用 JWT 1 无状态登录 1.1 什么是有状态? 有状态服务,即服务端需要记录每次会话的客户端信息,从而识别客户端身份,根据用户身份进行请求的处理,典型的设计如Tomcat中的Session。例如登录:用户登录后,我们把用户的信息保存在服务端session中,并且给用户一个cookie值,记录对应的session,然后下次请求,用户携带cookie值来(这一步有浏览器自动完成),我们就能识别到对应session,从而找到用户的信息。这种方式目前来看最方便,但是也有一些缺陷,如下:
服务端保存大量数据,增加服务端压力 服务端保存用户状态,不支持集群化部署 1.2 什么是无状态 微服务集群中的每个服务,对外提供的都使用RESTful风格的接口。而RESTful风格的一个最重要的规范就是:服务的无状态性,即:
服务端不保存任何客户端请求者信息 客户端的每次请求必须具备自描述信息,通过这些信息识别客户端身份 那么这种无状态性有哪些好处呢?
客户端请求不依赖服务端的信息,多次请求不需要必须访问到同一台服务器 服务端的集群和状态对客户端透明 服务端可以任意的迁移和伸缩(可以方便的进行集群化部署) 减小服务端存储压力 1.3.如何实现无状态 无状态登录的流程:
首先客户端发送账户名/密码到服务端进行认证 认证通过后,服务端将用户信息加密并且编码成一个token,返回给客户端 以后客户端每次发送请求,都需要携带认证的token 服务端对客户端发送来的token进行解密,判断是否有效,并且获取用户登录信息 1.4 JWT 1.4.1 简介 JWT,全称是Json Web Token, 是一种JSON风格的轻量级的授权和身份认证规范,可实现无状态、分布式的Web应用授权:
JWT 作为一种规范,并没有和某一种语言绑定在一起,常用的Java 实现是GitHub 上的开源项目 jjwt,地址如下:https://github.com/jwtk/jjwt
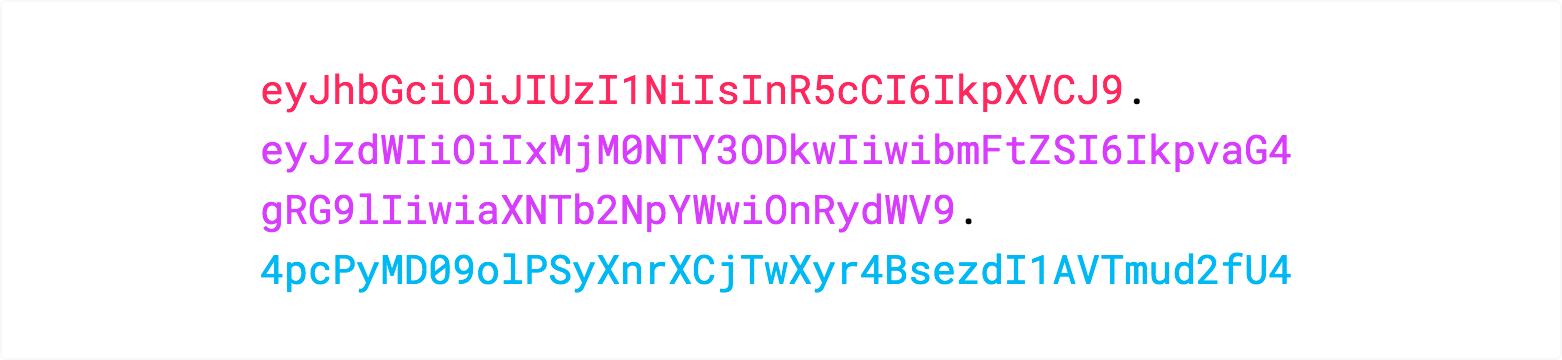
1.4.2 JWT数据格式 JWT包含三部分数据:
Header:头部,通常头部有两部分信息:
我们会对头部进行Base64Url编码(可解码),得到第一部分数据。
Payload:载荷,就是有效数据,在官方文档中(RFC7519),这里给了7个示例信息:
iss (issuer):表示签发人 exp (expiration time):表示token过期时间 sub (subject):主题 aud (audience):受众 nbf (Not Before):生效时间 iat (Issued At):签发时间 jti (JWT ID):编号 这部分也会采用Base64Url编码,得到第二部分数据。
Signature:签名,是整个数据的认证信息。一般根据前两步的数据,再加上服务的的密钥secret(密钥保存在服务端,不能泄露给客户端),通过Header中配置的加密算法生成。用于验证整个数据完整和可靠性。
生成的数据格式如下图:
注意,这里的数据通过 . 隔开成了三部分,分别对应前面提到的三部分,另外,这里数据是不换行的,图片换行只是为了展示方便而已。
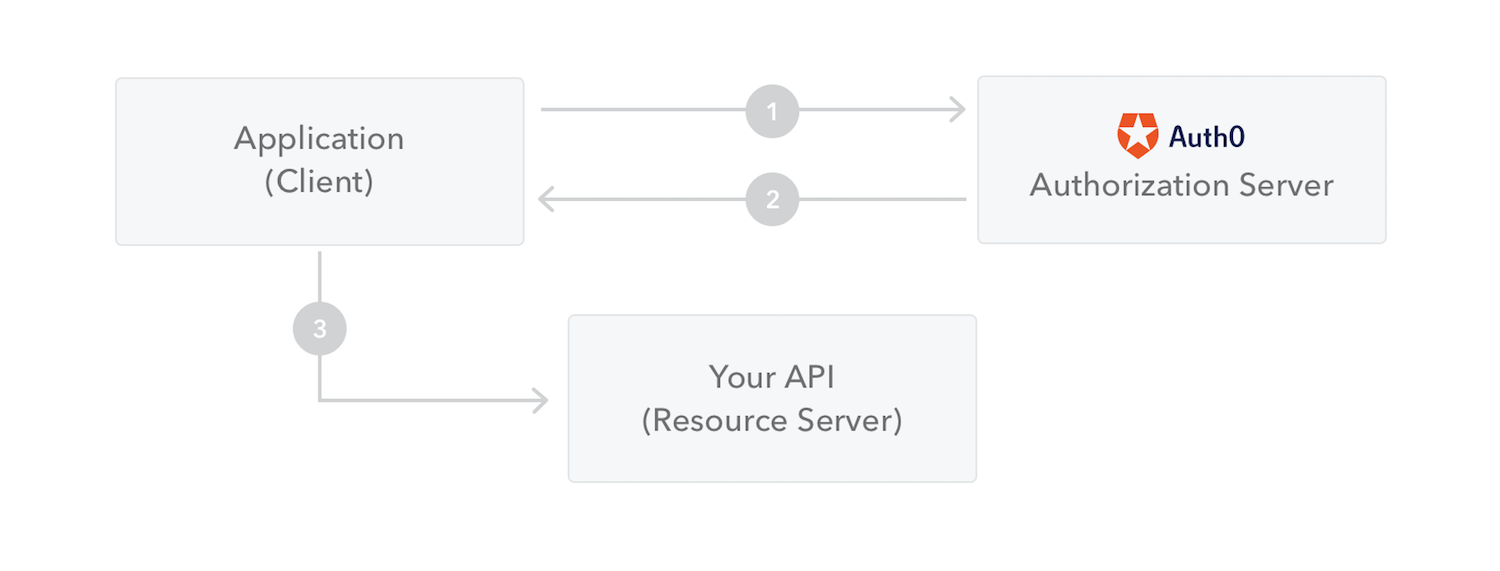
1.4.3 JWT交互流程 流程图:
步骤翻译:
应用程序或客户端向授权服务器请求授权 获取到授权后,授权服务器会向应用程序返回访问令牌 应用程序使用访问令牌来访问受保护资源(如API) 因为JWT签发的token中已经包含了用户的身份信息,并且每次请求都会携带,这样服务的就无需保存用户信息,甚至无需去数据库查询,这样就完全符合了RESTful的无状态规范。
1.5 JWT 存在的问题 说了这么多,JWT 也不是天衣无缝,由客户端维护登录状态带来的一些问题在这里依然存在,举例如下:
续签问题,这是被很多人诟病的问题之一,传统的cookie+session的方案天然的支持续签,但是jwt由于服务端不保存用户状态,因此很难完美解决续签问题,如果引入redis,虽然可以解决问题,但是jwt也变得不伦不类了。 注销问题,由于服务端不再保存用户信息,所以一般可以通过修改secret来实现注销,服务端secret修改后,已经颁发的未过期的token就会认证失败,进而实现注销,不过毕竟没有传统的注销方便。 密码重置,密码重置后,原本的token依然可以访问系统,这时候也需要强制修改secret。 基于第2点和第3点,一般建议不同用户取不同secret。 2 实战 说了这么久,接下来我们就来看看这个东西到底要怎么用?
2.1 环境搭建 首先我们来创建一个Spring Boot项目,创建时需要添加Spring Security依赖,创建完成后,添加 jjwt 依赖,完整的pom.xml文件如下:
1
2
3
4
5
6
7
8
9
10
11
12
13
<dependency> <groupId>org.springframework.boot</groupId> <artifactId>spring-boot-starter-security</artifactId> </dependency> <dependency> <groupId>org.springframework.boot</groupId> <artifactId>spring-boot-starter-web</artifactId> </dependency> <dependency> <groupId>io.jsonwebtoken</groupId> <artifactId>jjwt</artifactId> <version>0.9.1</version> </dependency>
然后在项目中创建一个简单的 User 对象实现 UserDetails 接口,如下:
1
2
3
4
5
6
7
8
9
10
11
12
13
14
15
16
17
18
19
20
21
22
23
24
25
public class User implements UserDetails { private String username; private String password; private List<GrantedAuthority> authorities; public String getUsername() { return username; } @Override public boolean isAccountNonExpired() { return true; } @Override public boolean isAccountNonLocked() { return true; } @Override public boolean isCredentialsNonExpired() { return true; } @Override public boolean isEnabled() { return true; } //省略getter/setter }
这个就是我们的用户对象,先放着备用,再创建一个HelloController,内容如下:
1
2
3
4
5
6
7
8
9
10
11
@RestController public class HelloController { @GetMapping("/hello") public String hello() { return "hello jwt !"; } @GetMapping("/admin") public String admin() { return "hello admin !"; } }
HelloController 很简单,这里有两个接口,设计是 /hello 接口可以被具有 user 角色的用户访问,而 /admin 接口则可以被具有 admin 角色的用户访问。
2.2 JWT 过滤器配置 接下来提供两个和 JWT 相关的过滤器配置:
一个是用户登录的过滤器,在用户的登录的过滤器中校验用户是否登录成功,如果登录成功,则生成一个token返回给客户端,登录失败则给前端一个登录失败的提示。 第二个过滤器则是当其他请求发送来,校验token的过滤器,如果校验成功,就让请求继续执行。 这两个过滤器,我们分别来看,先看第一个:
1
2
3
4
5
6
7
8
9
10
11
12
13
14
15
16
17
18
19
20
21
22
23
24
25
26
27
28
29
30
31
32
33
34
35
36
37
38
public class JwtLoginFilter extends AbstractAuthenticationProcessingFilter { protected JwtLoginFilter(String defaultFilterProcessesUrl, AuthenticationManager authenticationManager) { super(new AntPathRequestMatcher(defaultFilterProcessesUrl)); setAuthenticationManager(authenticationManager); } @Override public Authentication attemptAuthentication(HttpServletRequest req, HttpServletResponse resp) throws AuthenticationException, IOException, ServletException { User user = new ObjectMapper().readValue(req.getInputStream(), User.class); return getAuthenticationManager().authenticate(new UsernamePasswordAuthenticationToken(user.getUsername(), user.getPassword())); } @Override protected void successfulAuthentication(HttpServletRequest req, HttpServletResponse resp, FilterChain chain, Authentication authResult) throws IOException, ServletException { Collection<? extends GrantedAuthority> authorities = authResult.getAuthorities(); StringBuffer as = new StringBuffer(); for (GrantedAuthority authority : authorities) { as.append(authority.getAuthority()) .append(","); } String jwt = Jwts.builder() .claim("authorities", as)//配置用户角色 .setSubject(authResult.getName()) .setExpiration(new Date(System.currentTimeMillis() + 10 * 60 * 1000)) .signWith(SignatureAlgorithm.HS512,"sang@123") .compact(); resp.setContentType("application/json;charset=utf-8"); PrintWriter out = resp.getWriter(); out.write(new ObjectMapper().writeValueAsString(jwt)); out.flush(); out.close(); } protected void unsuccessfulAuthentication(HttpServletRequest req, HttpServletResponse resp, AuthenticationException failed) throws IOException, ServletException { resp.setContentType("application/json;charset=utf-8"); PrintWriter out = resp.getWriter(); out.write("登录失败!"); out.flush(); out.close(); } }
关于这个类,我说如下几点:
自定义 JwtLoginFilter 继承自 AbstractAuthenticationProcessingFilter,并实现其中的三个默认方法。 attemptAuthentication方法中,我们从登录参数中提取出用户名密码,然后调用AuthenticationManager.authenticate()方法去进行自动校验。 第二步如果校验成功,就会来到successfulAuthentication回调中,在successfulAuthentication方法中,将用户角色遍历然后用一个 , 连接起来,然后再利用Jwts去生成token,按照代码的顺序,生成过程一共配置了四个参数,分别是用户角色、主题、过期时间以及加密算法和密钥,然后将生成的token写出到客户端。 第二步如果校验失败就会来到unsuccessfulAuthentication方法中,在这个方法中返回一个错误提示给客户端即可。 再来看第二个token校验的过滤器:
1
2
3
4
5
6
7
8
9
10
11
12
13
14
15
public class JwtFilter extends GenericFilterBean { @Override public void doFilter(ServletRequest servletRequest, ServletResponse servletResponse, FilterChain filterChain) throws IOException, ServletException { HttpServletRequest req = (HttpServletRequest) servletRequest; String jwtToken = req.getHeader("authorization"); System.out.println(jwtToken); Claims claims = Jwts.parser().setSigningKey("sang@123").parseClaimsJws(jwtToken.replace("Bearer","")) .getBody(); String username = claims.getSubject();//获取当前登录用户名 List<GrantedAuthority> authorities = AuthorityUtils.commaSeparatedStringToAuthorityList((String) claims.get("authorities")); UsernamePasswordAuthenticationToken token = new UsernamePasswordAuthenticationToken(username, null, authorities); SecurityContextHolder.getContext().setAuthentication(token); filterChain.doFilter(req,servletResponse); } }
关于这个过滤器,我说如下几点:
首先从请求头中提取出 authorization 字段,这个字段对应的value就是用户的token。 将提取出来的token字符串转换为一个Claims对象,再从Claims对象中提取出当前用户名和用户角色,创建一个UsernamePasswordAuthenticationToken放到当前的Context中,然后执行过滤链使请求继续执行下去。 如此之后,两个和JWT相关的过滤器就算配置好了。
2.3 Spring Security 配置 接下来我们来配置 Spring Security,如下:
1
2
3
4
5
6
7
8
9
10
11
12
13
14
15
16
17
18
19
20
21
22
23
24
25
26
27
28
29
@Configuration public class WebSecurityConfig extends WebSecurityConfigurerAdapter { @Bean PasswordEncoder passwordEncoder() { return NoOpPasswordEncoder.getInstance(); } @Override protected void configure(AuthenticationManagerBuilder auth) throws Exception { auth.inMemoryAuthentication().withUser("admin") .password("123").roles("admin") .and() .withUser("sang") .password("456") .roles("user"); } @Override protected void configure(HttpSecurity http) throws Exception { http.authorizeRequests() .antMatchers("/hello").hasRole("user") .antMatchers("/admin").hasRole("admin") .antMatchers(HttpMethod.POST, "/login").permitAll() .anyRequest().authenticated() .and() .addFilterBefore(new JwtLoginFilter("/login",authenticationManager()),UsernamePasswordAuthenticationFilter.class) .addFilterBefore(new JwtFilter(),UsernamePasswordAuthenticationFilter.class) .csrf().disable(); } }
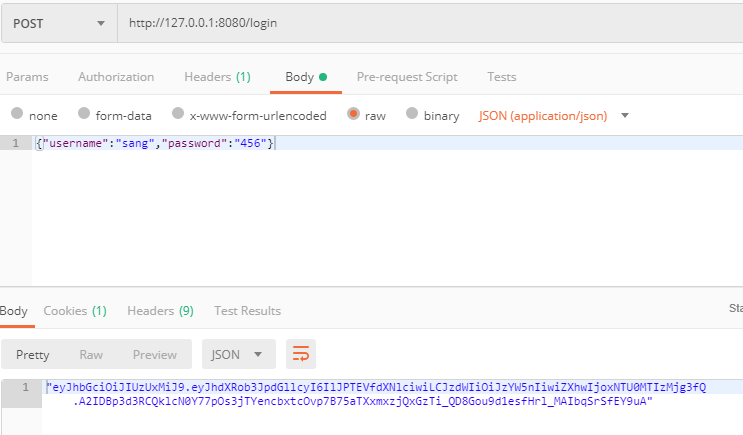
简单起见,这里我并未对密码进行加密,因此配置了NoOpPasswordEncoder的实例。 简单起见,这里并未连接数据库,我直接在内存中配置了两个用户,两个用户具备不同的角色。 配置路径规则时, /hello 接口必须要具备 user 角色才能访问, /admin 接口必须要具备 admin 角色才能访问,POST 请求并且是 /login 接口则可以直接通过,其他接口必须认证后才能访问。 最后配置上两个自定义的过滤器并且关闭掉csrf保护。 2.4 测试 做完这些之后,我们的环境就算完全搭建起来了,接下来启动项目然后在 POSTMAN 中进行测试,如下:
登录成功后返回的字符串就是经过 base64url 转码的token,一共有三部分,通过一个 . 隔开,我们可以对第一个 . 之前的字符串进行解码,即Header,如下:
再对两个 . 之间的字符解码,即 payload:
可以看到,我们设置信息,由于base64并不是加密方案,只是一种编码方案,因此,不建议将敏感的用户信息放到token中。
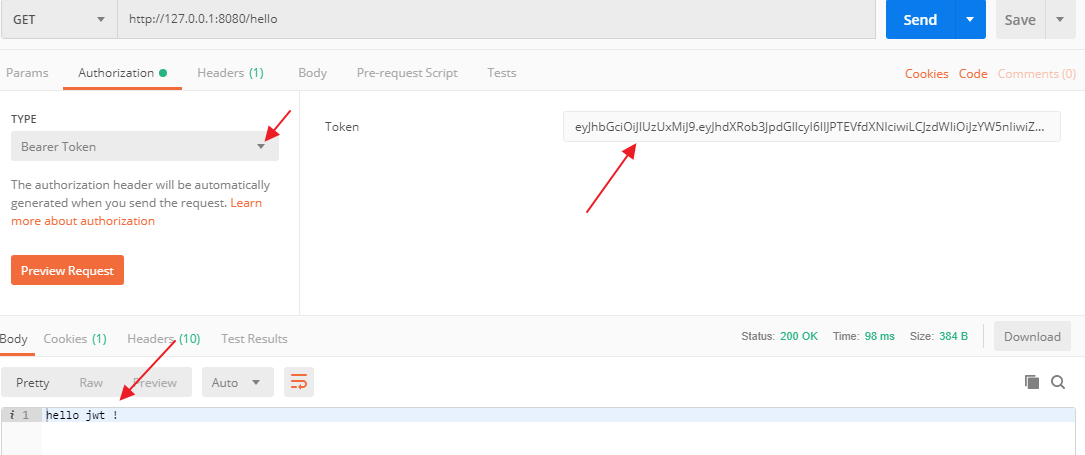
接下来再去访问 /hello 接口,注意认证方式选择 Bearer Token,Token值为刚刚获取到的值,如下:
可以看到,访问成功。
Spring Security 前后端分离登录,非法请求直接返回 JSON 在 Spring Security 中未获认证的请求默认会重定向到登录页,但是在前后端分离的登录中,这个默认行为则显得非常不合适,今天我们主要来看看如何实现未获认证的请求直接返回 JSON ,而不是重定向到登录页面。
前置知识 这里关于 Spring Security 的基本用法我就不再赘述了,如果小伙伴们不了解,可以参考上面的 6 篇文章。
大家知道,在自定义 Spring Security 配置的时候,有这样几个属性:
1
2
3
4
5
6
7
8
9
10
11
12
@Override protected void configure(HttpSecurity http) throws Exception { http.authorizeRequests() .anyRequest().authenticated() .formLogin() .loginProcessingUrl("/doLogin") .loginPage("/login") //其他配置 .permitAll() .and() .csrf().disable(); }
这里有两个比较重要的属性:
loginProcessingUrl:这个表示配置处理登录请求的接口地址,例如你是表单登录,那么 form 表单中 action 的值就是这里填的值。 loginPage:这个表示登录页的地址,例如当你访问一个需要登录后才能访问的资源时,系统就会自动给你通过重定向跳转到这个页面上来。 这种配置在前后端不分的登录中是没有问题的,在前后端分离的登录中,这种配置就有问题了。我举个简单的例子,例如我想访问 /hello 接口,但是这个接口需要登录之后才能访问,我现在没有登录就直接去访问这个接口了,那么系统会给我返回 302,让我去登录页面,在前后端分离中,我的后端一般是没有登录页面的,就是一个提示 JSON,例如下面这样:
1
2
3
4
@GetMapping("/login") public RespBean login() { return RespBean.error("尚未登录,请登录!"); }
完整代码大家可以参考我的微人事项目。
也就是说,当我没有登录直接去访问 /hello 这个接口的时候,我会看到上面这段 JSON 字符串。在前后端分离开发中,这个看起来没问题(后端不再做页面跳转,无论发生什么都是返回 JSON)。但是问题就出在这里,系统默认的跳转是一个重定向,就是说当你访问 /hello 的时候,服务端会给浏览器返回 302,同时响应头中有一个 Location 字段,它的值为 http://localhost:8081/login ,也就是告诉浏览器你去访问 http://localhost:8081/login 地址吧。浏览器收到指令之后,就会直接去访问 http://localhost:8081/login 地址,如果此时是开发环境并且请求还是 Ajax 请求,就会发生跨域。因为前后端分离开发中,前端我们一般在 NodeJS 上启动,然后前端的所有请求通过 NodeJS 做请求转发,现在服务端直接把请求地址告诉浏览器了,浏览器就会直接去访问 http://localhost:8081/login 了,而不会做请求转发了,因此就发生了跨域问题。
解决方案 很明显,上面的问题我们不能用跨域的思路来解决,虽然这种方式看起来也能解决问题,但不是最佳方案。
如果我们的 Spring Security 在用户未获认证的时候去请求一个需要认证后才能请求的数据,此时不给用户重定向,而是直接就返回一个 JSON,告诉用户这个请求需要认证之后才能发起,就不会有上面的事情了。
这里就涉及到 Spring Security 中的一个接口 AuthenticationEntryPoint ,该接口有一个实现类:LoginUrlAuthenticationEntryPoint ,该类中有一个方法 commence,如下:
1
2
3
4
5
6
7
8
9
10
11
12
13
14
15
16
17
18
19
20
21
22
23
24
25
26
/** * Performs the redirect (or forward) to the login form URL. */ public void commence(HttpServletRequest request, HttpServletResponse response, AuthenticationException authException) { String redirectUrl = null; if (useForward) { if (forceHttps && "http".equals(request.getScheme())) { redirectUrl = buildHttpsRedirectUrlForRequest(request); } if (redirectUrl == null) { String loginForm = determineUrlToUseForThisRequest(request, response, authException); if (logger.isDebugEnabled()) { logger.debug("Server side forward to: " + loginForm); } RequestDispatcher dispatcher = request.getRequestDispatcher(loginForm); dispatcher.forward(request, response); return; } } else { redirectUrl = buildRedirectUrlToLoginPage(request, response, authException); } redirectStrategy.sendRedirect(request, response, redirectUrl); }
首先我们从这个方法的注释中就可以看出,这个方法是用来决定到底是要重定向还是要 forward,通过 Debug 追踪,我们发现默认情况下 useForward 的值为 false,所以请求走进了重定向。
那么我们解决问题的思路很简单,直接重写这个方法,在方法中返回 JSON 即可,不再做重定向操作,具体配置如下:
1
2
3
4
5
6
7
8
9
10
11
12
13
14
15
16
17
18
19
20
21
22
23
24
25
26
@Override protected void configure(HttpSecurity http) throws Exception { http.authorizeRequests() .anyRequest().authenticated() .formLogin() .loginProcessingUrl("/doLogin") .loginPage("/login") //其他配置 .permitAll() .and() .csrf().disable().exceptionHandling() .authenticationEntryPoint(new AuthenticationEntryPoint() { @Override public void commence(HttpServletRequest req, HttpServletResponse resp, AuthenticationException authException) throws IOException, ServletException { resp.setContentType("application/json;charset=utf-8"); PrintWriter out = resp.getWriter(); RespBean respBean = RespBean.error("访问失败!"); if (authException instanceof InsufficientAuthenticationException) { respBean.setMsg("请求失败,请联系管理员!"); } out.write(new ObjectMapper().writeValueAsString(respBean)); out.flush(); out.close(); } }); }
在 Spring Security 的配置中加上自定义的 AuthenticationEntryPoint 处理方法,该方法中直接返回相应的 JSON 提示即可。这样,如果用户再去直接访问一个需要认证之后才可以访问的请求,就不会发生重定向操作了,服务端会直接给浏览器一个 JSON 提示,浏览器收到 JSON 之后,该干嘛干嘛。
OAuth2 OAuth 是一个开放标准,该标准允许用户让第三方应用访问该用户在某一网站上存储的私密资源(如头像、照片、视频等),而在这个过程中无需将用户名和密码提供给第三方应用。实现这一功能是通过提供一个令牌(token),而不是用户名和密码来访问他们存放在特定服务提供者的数据。采用令牌(token)的方式可以让用户灵活的对第三方应用授权或者收回权限。
OAuth2 是 OAuth 协议的下一版本,但不向下兼容 OAuth 1.0。传统的 Web 开发登录认证一般都是基于 session 的,但是在前后端分离的架构中继续使用 session 就会有许多不便,因为移动端(Android、iOS、微信小程序等)要么不支持 cookie(微信小程序),要么使用非常不便,对于这些问题,使用 OAuth2 认证都能解决。
授权模式 OAuth协议的授权模式共分为四种:
授权码模式:常见的第三方平台登录功能基本都是使用这种模式。 简化模式:简化模式是不需要客户端服务器参与,直接在浏览器中向授权服务器申请令牌(token),一般如果网站是纯静态页面则可以采用这种方式。 密码模式:密码模式是用户把用户名密码直接告诉客户端,客户端使用说这些信息向授权服务器申请令牌(token)。这需要用户对客户端高度信任,例如客户端应用和服务提供商就是同一家公司。 客户端模式:客户端模式是指客户端使用自己的名义而不是用户的名义向服务提供者申请授权,严格来说,客户端模式并不能算作 OAuth 协议要解决的问题的一种解决方案,但是,对于开发者而言,在一些前后端分离应用或者为移动端提供的认证授权服务器上使用这种模式还是非常方便的。 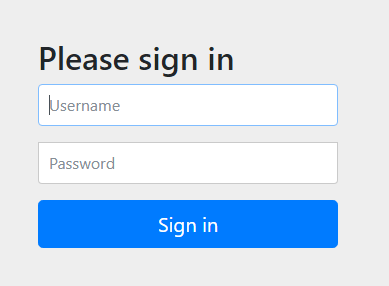


 觉得还不错,请他喝一瓶可乐
 雪碧也是可以的