什么是阻塞队列
阻塞队列
public interface BlockingQueue
BlockingQueue 下面有 6 种最主要的实现,分别是 ArrayBlockingQueue、LinkedBlockingQueue、SynchronousQueue、DelayQueue、PriorityBlockingQueue 和 LinkedTransferQueue
take方法
获取并移除队列的头结点
一旦执行 take 方法的时候,队列里无数据,则阻塞,直到队列里有数据。一旦队列里有数据了,就会立刻解除阻塞状态,并且取到数据
pull方法
插入元素
如果队列已满,那么就无法继续插入,则阻塞,直到队列里有了空闲空间
无界队列 LinkedBlockingQueue
有界队列 ArrayBlockingQueue
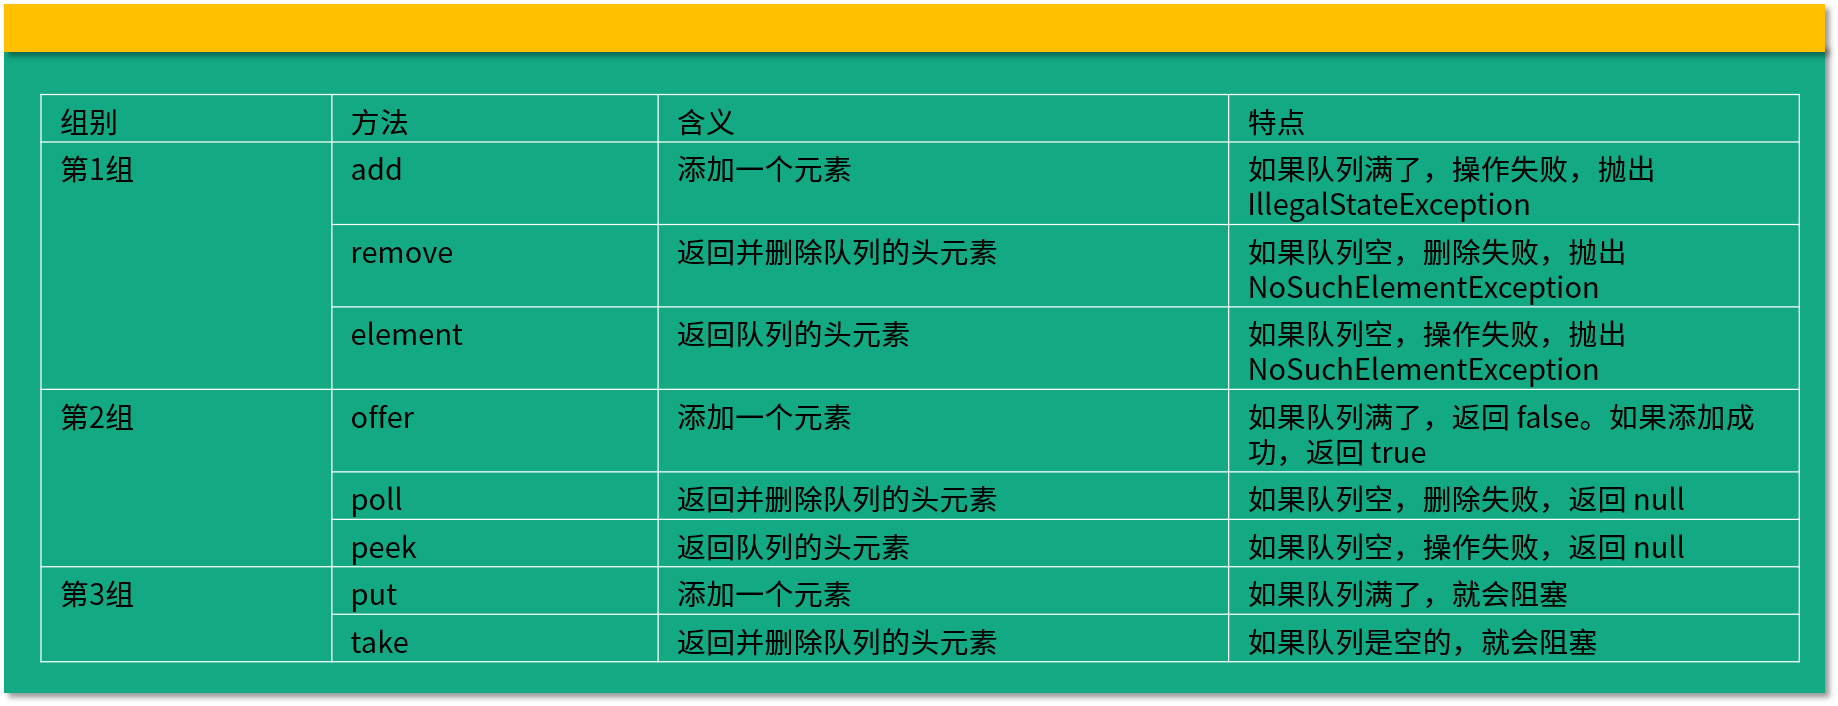
BlockingQueue 中最常用的和添加、删除相关的 8 个方法
1、抛出异常:add、remove、element
2、返回结果但不抛出异常:offer、poll、peek
3、阻塞:put、take
add
往队列里添加一个元素,如果队列满了,就会抛出异常来提示队列已满
1 | private static void addTest() { |
1 | Exception in thread "main" java.lang.IllegalStateException:Queue full |
remove
删除元素,如果我们删除的队列是空的,由于里面什么都没有,所以也无法删除任何元素,那么 remove 方法就会抛出异常
1 | private static void removeTest() { |
1 | Exception in thread "main" java.util.NoSuchElementException |
element
返回队列的头部节点
1 | private static void elementTest() { |
offter
插入一个元素,并用返回值来提示插入是否成功
1 | private static void offerTest() { |
poll
移除并返回队列的头节点
1 | private static void pollTest() { |
peek
返回队列的头元素但并不删除
如果队列里面是空的,它便会返回 null 作为提示
1 | private static void peekTest() { |
put、take
插入元素、移除队列的头结点
第一组的特点是在无法正常执行的情况下抛出异常;第二组的特点是在无法正常执行的情况下不抛出异常,但会用返回值提示运行失败;第三组的特点是在遇到特殊情况时让线程陷入阻塞状态,等到可以运行再继续执行。
阻塞队列和非阻塞队列的并发安全原理,其中阻塞队列最主要是利用了 ReentrantLock 以及它的 Condition 来实现,而非阻塞队列则是利用 CAS 方法实现线程安全。
ArrayBlockingQueue 的源码,ArrayBlockingQueue 有以下几个重要的属性:
1 | // 用于存放元素的数组 |
1 | // 以下3个是控制并发用的工具 |
这三个变量也非常关键,第一个就是一个 ReentrantLock,而下面两个 Condition 分别是由 ReentrantLock 产生出来的,这三个变量就是我们实现线程安全最核心的工具。
ArrayBlockingQueue 实现并发同步的原理就是利用 ReentrantLock 和它的两个 Condition,读操作和写操作都需要先获取到 ReentrantLock 独占锁才能进行下一步操作。进行读操作时如果队列为空,线程就会进入到读线程专属的 notEmpty 的 Condition 的队列中去排队,等待写线程写入新的元素;同理,如果队列已满,这个时候写操作的线程会进入到写线程专属的 notFull 队列中去排队,等待读线程将队列元素移除并腾出空间。
put方法
1 | public void put(E e) throws InterruptedException { |
在 put 方法中,首先用 checkNotNull 方法去检查插入的元素是不是 null。如果不是 null,我们会用 ReentrantLock 上锁,并且上锁方法是 lock.lockInterruptibly()。这个方法我们在第 23 课时的时候讲过,在获取锁的同时是可以响应中断的,这也正是我们的阻塞队列在调用 put 方法时,在尝试获取锁但还没拿到锁的期间可以响应中断的底层原因。
紧接着 ,是一个非常经典的 try finally 代码块,finally 中会去解锁,try 中会有一个 while 循环,它会检查当前队列是不是已经满了,也就是 count 是否等于数组的长度。如果等于就代表已经满了,于是我们便会进行等待,直到有空余的时候,我们才会执行下一步操作,调用 enqueue 方法让元素进入队列,最后用 unlock 方法解锁。
非阻塞队列 ConcurrentLinkedQueue 使用 CAS 非阻塞算法 + 不停重试,来实现线程安全,适合用在不需要阻塞功能,且并发不是特别剧烈的场景。
线程池对于阻塞队列的选择

 觉得还不错,请他喝一瓶可乐
 雪碧也是可以的